Skip to content
ShowerThinking
 
  • Salesforce partner
    • Marketing Cloud
    • Personalization
    • Intelligence
    • Data Cloud
  • About us
  • Case Studies
  • Webinars
  • Blog
  • Contact
  • Salesforce partner
    • Marketing Cloud
    • Personalization
    • Intelligence
    • Data Cloud
  • About us
  • Case Studies
  • Webinars
  • Blog
  • Contact
  • ES
  • EN
ShowerThinking
 
ES
EN
  • Salesforce partner
    • Marketing Cloud
    • Personalization
    • Intelligence
    • Data Cloud
  • About us
  • Case Studies
  • Webinars
  • Blog
  • Contact
  • Salesforce partner
    • Marketing Cloud
    • Personalization
    • Intelligence
    • Data Cloud
  • About us
  • Case Studies
  • Webinars
  • Blog
  • Contact

Checkbox and radio button style

Feature image checkbox and radio button style
Making forms in Pardot not boring is easy by adding CSS code. Let’s see how to customize the checkboxes and radio buttons on our Pardot forms.

Before we start, let’s remember…Pardot css Form
How do we add custom CSS to our forms?

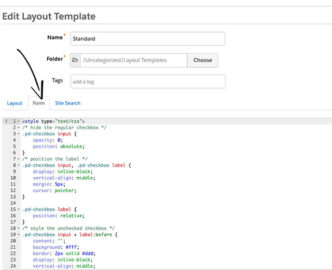
Go to the left side menu: MARKETING / FORMS / LAYOUT TEMPLATES and select the design to add the form styles, once selected we give you EDIT LAYOUT TEMPLATE, and paste the CSS over the existing code in the Form tab, and save.

Remembering this, we start with the styles for the checkboxes.

How to style the checkboxes

One of the disadvantages of using Pardot forms is the inability to modify the HTML structure of the form, so we have to take advantage of standard Pardot HTML to design the checkboxes.

STANDARD HTML

As we see in the HTML code, all checkboxes are wrapped in a paragraph tag, with the class pd-checkbox. This is how we will name it in the CSS.

See the Pen
El HTML de las casillas de verificación de pardot por defecto
by Showerthinking (@Showerthinking)
on CodePen.

CSS STYLES

The default checkbox will be hidden and the :before selector will be used to design the new checkbox, with the desired styles.

(.pd-checkbox : before)

The check icons inside the boxes will be loaded from FontAwesome, so you have to insert the library link to view the icons. The link is inserted inside the head in the HTML structure.

See the Pen
link de www.awesome.com y CSS, checkbox
by Showerthinking (@Showerthinking)
on CodePen.

THE RESULT

The checkboxes will look like this once the CSS has been added to the form in Pardot.

See the Pen
Checkbox personalizadas para Pardot
by Showerthinking (@Showerthinking)
on CodePen.

As you can see, also within the CSS we have called the FontAwesome library. @import url(‘https://maxcdn.bootstrapcdn.com/font-awesome/4.7.0/css/font-awesome.min.css’) Adding the library loads the verification icons. In the CSS styles, in ‘content’ you put the fontAwesome class of the desired icon.


Radio buttons How do we style it?

The radio buttons are quite similar to the checkboxes, but with a little extra CSS to make them look like a radio button. Just like the checkboxes, we’ll take advantage of the HTML provided by Pardot, so all we have to do to customize them is add CSS.

STANDARD HTML

As we can see, all the radio buttons in Pardot are wrapped in a paragraph label, with the class pd-radio. This is how we will name it in the CSS.

See the Pen
El HTML de los botones de radio en pardot por defecto
by Showerthinking (@Showerthinking)
on CodePen.

CSS STYLES

Like the CSS for the checkboxes, the FontAwesome library will load to display the radio button check icon, while the default radio button will be hidden.

See the Pen
Css, botones de radio
by Showerthinking (@Showerthinking)
on CodePen.

Forms in Pardot: Form Handlers vs iFrame Form

Fetured image Forms Pardot Forms Handlers vs iFrame

Forms have become one of the most important elements for many companies’ marketing teams, because of their ability to capture information from visitors to their websites and turn them into prospects. Choosing the type of form to use depending on the situation is sometimes not an easy task. For this reason, we will analyze the main differences that Pardot offers us, between Pardot Forms or “iFrames” and Form handlers, and which one of these two best suits your needs.

The main difference between an iFrame and a Form Handler is that the latter allows you to integrate forms from third parties, external to Pardot, that is if you had a form before using Pardot, and you need to integrate it into Pardot, through the “Form Handlers” you can do it. This option is not available with iFrames.

WHEN TO USE A FORMS HANDLER INSTEAD OF A PARDOT IFRAME

Below are five things to consider when choosing a Form Handler over an iFrame or Pardot Form.

  1. Form handlers allow us full control over the look of our forms, as you can design the outside of Pardot and the range of possibilities is greater.
  2. Publish the application data in more than one database, i.e. once a visitor fills in the form and becomes a prospect, this information will go into our Pardot database and the original database, prior to the use of Pardot.
  3. If you need to map out a Login form, which includes information like financial data, or passwords
  4. Integrate Pardot with your existing forms
  5. Use the “third party data” form tool.

However, if you find yourself in a different situation, where none of the above scenarios fit your needs, it is because you probably need an iFrame.

WHEN TO USE A PARDOT FORMS OR IFRAME INSTEAD OF A FORM HANDLER

iFrames, unlike Form Handlers, are forms that we create and manage entirely from Pardot, once created we can easily integrate them into our website, copying the HTML code. iFrames are the most used by most people.

Some of the advantages of choosing an IFrame instead of a Form Handler

  • Progressive profiles: iFrames allow us to dynamically change or hide fields about the information you already have from the client, which translates into smaller forms and therefore more options for them to be filled in.
  • Integrated robot protection: All Pardot forms have a honeypot and a conditional CAPTCHA. The good news is that neither you nor the prospects will know if you want it there. If you think it is necessary to add an extra layer of security you can add a ReCaptcha with its corresponding checkbox.
  • Iframe visits and data error: Using an iFrame, gives us more information about how you are responding to the form. If for example, you have an unusually high error rate, Pardot recommends you to be less strict with the information you request in the fields or reduce the number of fields.
  • Using IFrames in Pardot Landings: Once you create an iFrame you can easily add it to a landing created in Pardot. Remember that if a prospect completes a form in a landing made in Pardot, the information will be found in the reporting part of the landing pages instead of the forms.
  • Automate based on form views: Thanks to the information that Pardot offers us about visits, we can automate based on the data obtained. In this way, if a prospect has visited our form we can create a notice and have it reach us in the form of a notification, or we can label it as well.
  • Display the “Thank you page” after the form is completed: If you want to have full control over the “thank you” message generated after the form is completed, then you will want to host these forms at Pardot, this will allow you to make changes to the message quickly and easily.

CONCLUSIONS

I hope that at this point you will be able to distinguish the main differences between Form Handlers and iFrames, and that you will be able to assess which of the two best suits your needs. The following is a summary of the main characteristics of each form.


NEED… PARDOT
FORM
FORM
HANDLER


Avoiding Duplicity of Data in Pardot Check Circle Regular Check Circle Regular
Validate email addresses Check Circle Regular Check Circle Regular
Provides the option of progressive profiling Check Circle Regular
Provides protection against bots Check Circle Regular
Provides the option of progressive profiling Check Circle Regular
Integrates with third party forms Check Circle Regular
Maintains the current flow of candidates Check Circle Regular
Integrates with Salesforce web candidate forms Check Circle Regular
Supports custom interface modification Check Circle Regular
Provides data on form views and error data Check Circle Regular
Provide field level change audits for potential customers Check Circle Regular Check Circle Regular
Integrates with Pardot home pages Check Circle Regular
Adding Automation Rules based on form visits Check Circle Regular
Adding Automation Rules to completed forms Check Circle Regular Check Circle Regular
Send auto reply emails from Pardot Check Circle Regular Check Circle Regular
Redirect to a correct action page Check Circle Regular Check Circle Regular
Shows the content of Pardot’s thanks after a form has been sent Check Circle Regular

How to integrate the Gravity Forms plugin with Pardot

Salesforce pardot the gravity forms
Gravity Forms is one of the easiest tools to create advanced forms for your WordPress website and with some customization can be integrated with Pardot. Let’s see in steps how to integrate Gravity Forms using Pardot Form Handlers.

1. Create your Form Handler 

The first step is to create the Form Handler. I won’t go into detail about how to set up the Gravity form, but if you are new to this WordPress add-on take a look at the plugin’s documentation.

2. Create your Form handler in Pardot

In Pardot, go to the side menu: MARKETING/FORMHANDLERS and create a new form handler. We name the form, select its corresponding campaign and configure it as follows:

  • Kiosk/Data Entry Mode: Do not cookie browser as submitted prospect. BOX DEACTIVATED
  • Enable data forwarding to the success location. CHECKBOX ACTIVATED
  • Disable Visitor Activity throttling and send auto-responder emails after every submission. DISABLE BOX
  • Success Location* Success Location should be your thank you page.
  • Error Location* The error location must be your referral URL.

Form handler Pardot

3. Add the fields

Form field

The next step is to add the form fields. I recommend that only one email address is required.

The validation of the other required fields will be done through the Gravity Forms plugin.

4. Configuration in Gravity Forms

In your wordpress go to the Gravity Forms plug-in and click on SETTINGS/ CONFIRMATIONS and ADD NEW. Copy the URL of the pardot form and paste it into the REDIRECT URL box of the Gravity Forms plug-in in your WordPress, as in the example below:

https://showerthinking.com/wp-content/uploads/2020/10/loop1-4s.mp4


Now comes the most complex part, for the data of the Gravity Form to be synchronized with Pardot, the fields need to be mapped.

Select Pass Field Data Via Query String and a text area will appear. This is where we enter the names of the fields created in Pardot’s form.

The syntax would be as follows:

 pardot-field-name ={Gravity Form Field Name} &pardot-field-name ={Gravity Form Field Name}etc


Name form fields

You can find the names of the form fields in
pardot, by editing the form and scrolling down
to Form Fields.


Within
Gravity Form you can find the field names (FORM FIELDS) by selecting the arrow next to the text box. As shown below.

https://showerthinking.com/wp-content/uploads/2020/10/demo-pardot2-16s.mp4


Now we configure the
CONDITIONAL LOGIC.

Condicional logic

This is what the correct configuration looks like as a whole.

Result Gravity Form

Last but not least, try out your form and make sure the data goes into Pardot.

Innovation by difference.

1 Yonge Street, Suite 1801 Toronto, Ontario M5E 1W7 Canada
Phone: +1 (416) 424-3133

ShowerThinking © 2025. All rights reserved.

Legal notice | Privacy policy | Cookie policy | ISMS Policy
We use cookies on our website to give you the most relevant experience by remembering your preferences and repeat visits. By clicking “Accept”, you consent to the use of ALL the cookies. However you may visit Cookie Settings to provide a controlled consent.
Cookie settingsACCEPT
Privacy & Cookies Policy

Privacy Overview

This website uses cookies to improve your experience while you navigate through the website. Out of these cookies, the cookies that are categorized as necessary are stored on your browser as they are essential for the working of basic functionalities of the website. We also use third-party cookies that help us analyze and understand how you use this website. These cookies will be stored in your browser only with your consent. You also have the option to opt-out of these cookies. But opting out of some of these cookies may have an effect on your browsing experience.
Necessary
Always Enabled

Necessary cookies are absolutely essential for the website to function properly. This category only includes cookies that ensures basic functionalities and security features of the website. These cookies do not store any personal information.

CookieDurationDescription
cookielawinfo-checkbox-advertisement1 yearThis cookie is set by GDPR Cookie Consent plugin. The purpose of this cookie is to check whether or not the user has given their consent to the usage of cookies under the category 'Advertisement'.
cookielawinfo-checkbox-analytics1 yearThis cookie is set by GDPR Cookie Consent plugin. The purpose of this cookie is to check whether or not the user has given the consent to the usage of cookies under the category 'Analytics'.
cookielawinfo-checkbox-necessary11 monthsThis cookie is set by GDPR Cookie Consent plugin. The cookies is used to store the user consent for the cookies in the category "Necessary".
cookielawinfo-checkbox-non-necessary11 monthsThis cookie is set by GDPR Cookie Consent plugin. The cookies is used to store the user consent for the cookies in the category "Non Necessary".
cookielawinfo-checkbox-performance1 yearThis cookie is set by GDPR Cookie Consent plugin. The purpose of this cookie is to check whether or not the user has given the consent to the usage of cookies under the category 'Performance'.
cookielawinfo-checkbox-preferences1 yearThis cookie is set by GDPR Cookie Consent plugin. The purpose of this cookie is to check whether or not the user has given the consent to the usage of cookies under the category 'Preferences'.
viewed_cookie_policy11 monthsThe cookie is set by the GDPR Cookie Consent plugin and is used to store whether or not user has consented to the use of cookies. It does not store any personal data.
Non Necessary

Any cookies that may not be particularly necessary for the website to function and is used specifically to collect user personal data via analytics, ads, other embedded contents are termed as non-necessary cookies. It is mandatory to procure user consent prior to running these cookies on your website.

CookieDurationDescription
__cfruidPersistentThe ‘__cfduid’ cookie is set by the CloudFlare service to identify trusted web traffic. It does not correspond to any user id in the web application, nor does it save any personally identifiable data
test_cookie11 monthsThis cookie sets DoubleClick (which is owned by Google) to determine if the website visitor's browser supports cookies.
Preferences

Preference cookies are used to store user preferences to provide content that is customized and convenient for the users, like the language of the website or the location of the visitor.

CookieDurationDescription
_gat_UA-2503304-401 minuteThis is a pattern type cookie set by Google Analytics, where the pattern element on the name contains the unique identity number of the account or website it relates to. It appears to be a variation of the _gat cookie which is used to limit the amount of data recorded by Google on high traffic volume websites.
Analytics

Analytical cookies are used to understand how visitors interact with the website. These cookies help provide information on metrics the number of visitors, bounce rate, traffic source, etc.

CookieDurationDescription
_ga2 yearsThis cookie is installed by Google Analytics. The cookie is used to calculate visitor, session, camapign data and keep track of site usage for the site's analytics report. The cookies store information anonymously and assigns a randoly generated number to identify unique visitors.
_gid1 dayThis cookie is installed by Google Analytics. The cookie is used to store information of how visitors use a website and helps in creating an analytics report of how the wbsite is doing. The data collected including the number visitors, the source where they have come from, and the pages viisted in an anonymous form.
GPS30 minutesThis cookie is set by Youtube and registers a unique ID for tracking users based on their geographical location
pardotThe cookie is set when the visitor is logged in as a Pardot user.
Advertisement

Advertisement cookies are used to provide visitors with relevant ads and marketing campaigns. These cookies track visitors across websites and collect information to provide customized ads.

CookieDurationDescription
IDE2 yearsUsed by Google DoubleClick and stores information about how the user uses the website and any other advertisement before visiting the website. This is used to present users with ads that are relevant to them according to the user profile.
VISITOR_INFO1_LIVE5 monthsThis cookie is set by Youtube. Used to track the information of the embedded YouTube videos on a website.

Performance

Performance cookies are used to understand and analyze the key performance indexes of the website which helps in delivering a better user experience for the visitors.

CookieDurationDescription
YSCSessionThis cookies is set by Youtube and is used to track the views of embedded videos.
YTC10 minutesThis cookie is set by Youtube to manage the embed and viewing of videos on our website
Save & Accept