Checkbox and radio button style

Feature image checkbox and radio button style
Making forms in Pardot not boring is easy by adding CSS code. Let’s see how to customize the checkboxes and radio buttons on our Pardot forms.

Before we start, let’s remember…Pardot css Form
How do we add custom CSS to our forms?

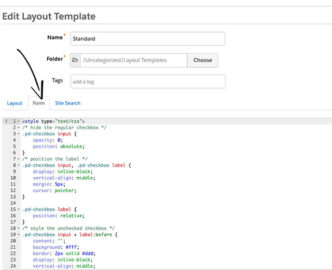
Go to the left side menu: MARKETING / FORMS / LAYOUT TEMPLATES and select the design to add the form styles, once selected we give you EDIT LAYOUT TEMPLATE, and paste the CSS over the existing code in the Form tab, and save.

Remembering this, we start with the styles for the checkboxes.

How to style the checkboxes

One of the disadvantages of using Pardot forms is the inability to modify the HTML structure of the form, so we have to take advantage of standard Pardot HTML to design the checkboxes.

STANDARD HTML

As we see in the HTML code, all checkboxes are wrapped in a paragraph tag, with the class pd-checkbox. This is how we will name it in the CSS.

CSS STYLES

The default checkbox will be hidden and the :before selector will be used to design the new checkbox, with the desired styles.

(.pd-checkbox : before)

The check icons inside the boxes will be loaded from FontAwesome, so you have to insert the library link to view the icons. The link is inserted inside the head in the HTML structure.

See the Pen
link de www.awesome.com y CSS, checkbox
by Showerthinking (@Showerthinking)
on CodePen.

THE RESULT

The checkboxes will look like this once the CSS has been added to the form in Pardot.

See the Pen
Checkbox personalizadas para Pardot
by Showerthinking (@Showerthinking)
on CodePen.

As you can see, also within the CSS we have called the FontAwesome library. @import url(‘https://maxcdn.bootstrapcdn.com/font-awesome/4.7.0/css/font-awesome.min.css’) Adding the library loads the verification icons. In the CSS styles, in ‘content’ you put the fontAwesome class of the desired icon.


Radio buttons How do we style it?

The radio buttons are quite similar to the checkboxes, but with a little extra CSS to make them look like a radio button. Just like the checkboxes, we’ll take advantage of the HTML provided by Pardot, so all we have to do to customize them is add CSS.

STANDARD HTML

As we can see, all the radio buttons in Pardot are wrapped in a paragraph label, with the class pd-radio. This is how we will name it in the CSS.

See the Pen
El HTML de los botones de radio en pardot por defecto
by Showerthinking (@Showerthinking)
on CodePen.

CSS STYLES

Like the CSS for the checkboxes, the FontAwesome library will load to display the radio button check icon, while the default radio button will be hidden.

See the Pen
Css, botones de radio
by Showerthinking (@Showerthinking)
on CodePen.

How to integrate the Gravity Forms plugin with Pardot

Salesforce pardot the gravity forms
Gravity Forms is one of the easiest tools to create advanced forms for your WordPress website and with some customization can be integrated with Pardot. Let’s see in steps how to integrate Gravity Forms using Pardot Form Handlers.

1. Create your Form Handler 

The first step is to create the Form Handler. I won’t go into detail about how to set up the Gravity form, but if you are new to this WordPress add-on take a look at the plugin’s documentation.

2. Create your Form handler in Pardot

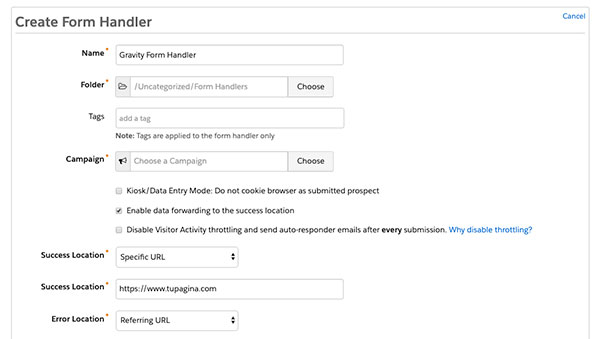
In Pardot, go to the side menu: MARKETING/FORMHANDLERS and create a new form handler. We name the form, select its corresponding campaign and configure it as follows:

  • Kiosk/Data Entry Mode: Do not cookie browser as submitted prospect. BOX DEACTIVATED
  • Enable data forwarding to the success location. CHECKBOX ACTIVATED
  • Disable Visitor Activity throttling and send auto-responder emails after every submission. DISABLE BOX
  • Success Location* Success Location should be your thank you page.
  • Error Location* The error location must be your referral URL.

Form handler Pardot

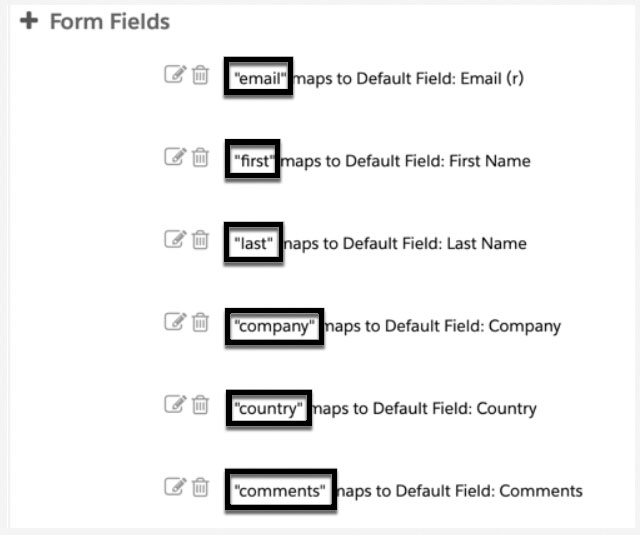
3. Add the fields

Form field

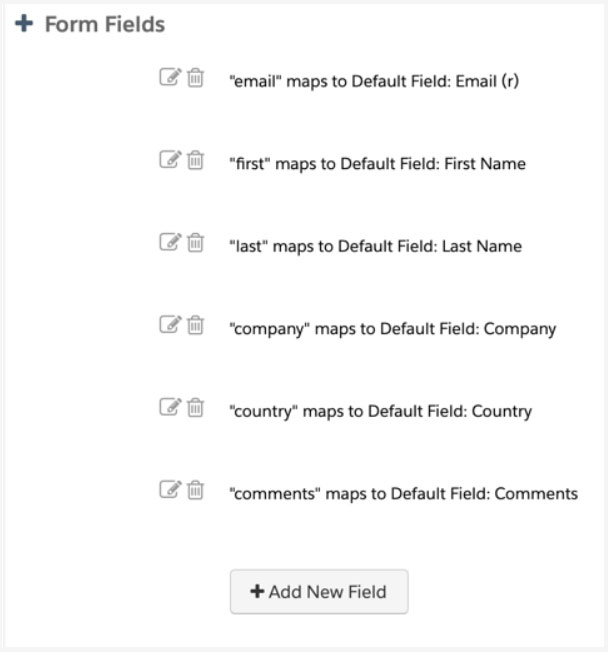
The next step is to add the form fields. I recommend that only one email address is required.

The validation of the other required fields will be done through the Gravity Forms plugin.

4. Configuration in Gravity Forms

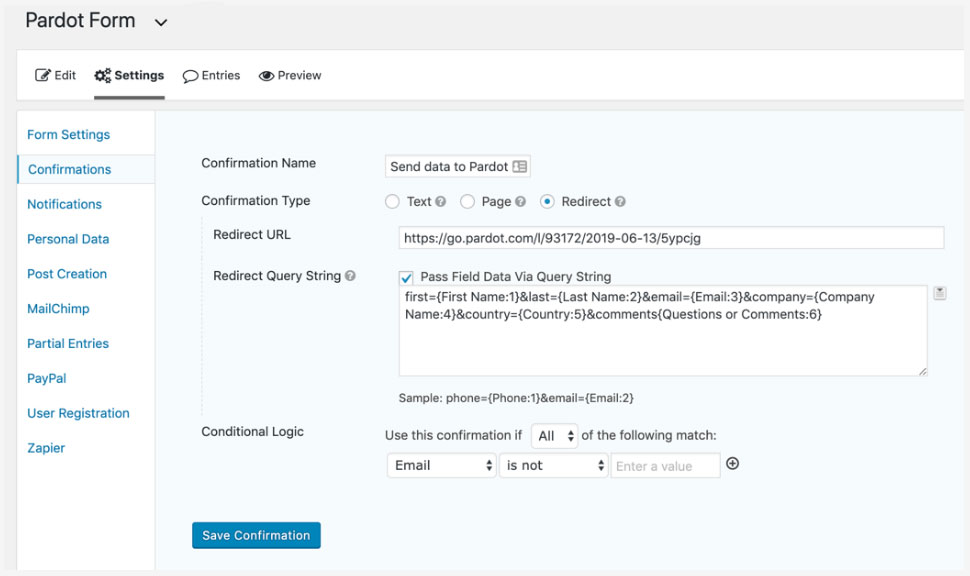
In your wordpress go to the Gravity Forms plug-in and click on SETTINGS/ CONFIRMATIONS and ADD NEW. Copy the URL of the pardot form and paste it into the REDIRECT URL box of the Gravity Forms plug-in in your WordPress, as in the example below:


Now comes the most complex part, for the data of the Gravity Form to be synchronized with Pardot, the fields need to be mapped.

Select Pass Field Data Via Query String and a text area will appear. This is where we enter the names of the fields created in Pardot’s form.

The syntax would be as follows:

 pardot-field-name ={Gravity Form Field Name} &pardot-field-name ={Gravity Form Field Name}etc


Name form fields

You can find the names of the form fields in
pardot, by editing the form and scrolling down
to Form Fields.


Within
Gravity Form you can find the field names (FORM FIELDS) by selecting the arrow next to the text box. As shown below.


Now we configure the
CONDITIONAL LOGIC.

Condicional logic

This is what the correct configuration looks like as a whole.

Result Gravity Form

Last but not least, try out your form and make sure the data goes into Pardot.