If you have reached this post, it is probably because you have difficulties in understanding what a Sender Profile is when you work with the Marketing Cloud. Read on to find out what a Sender Profile really is, the possibilities it offers to get the most out of it and everything it brings to you within the Marketing Cloud.
This post is focused on the knowledge about Sender Profiles in the Email Studio module within Marketing Cloud. If you still don’t know this module of Marketing Cloud, we invite you to read the following article, where we talk in depth about what Email Studio is: Email Studio in Marketing Cloud: what it is and what it offers. On the other hand, if you still do not know the Marketing Cloud platform or have not been clear about some concepts about it, you can visit the following article to familiarize yourself with it and know What is Marketing Cloud? The Salesforce Digital Marketing Hub.
What is a Sender Profile?
A Sender Profile in the Marketing Cloud, as its name suggests, is a profile that specifies shipping information and can be reused as many times as you want just by selecting the correct profile in the shipment.
The Sender Profile has its own name, which is very useful when identifying the different Sender Profiles (for example, if we handle Marketing Cloud for an international company, we can create different Sender Profiles for each country and differentiate them by name).
Within each Sender Profile there are two very important configuration sections:
- Sender Information. Here you specify the name of the Sender itself in the e-mails and also the e-mail address through which you will be sending them (the “from name” and “from e-mail” fields respectively).
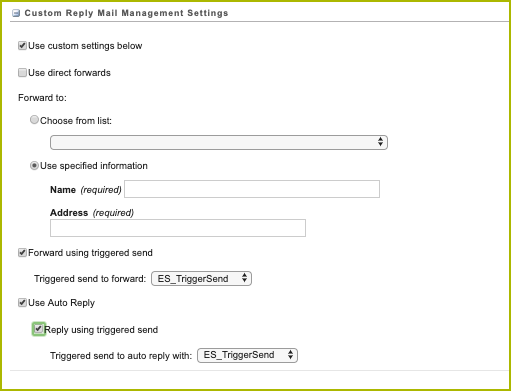
- Custom Reply Mail Management Settings. Through this section, what allows you Marketing Cloud is to configure a “from name” and “from email” to perform forwarding, as well as configure auto-responses and forwarding through Triggered Send, which will be explained later.
Likewise, you can configure Sender Profiles based on the users we have in the Marketing Cloud. This is useful for companies that make personalized sendings through their employees.
What allows us to do a Sender Profile in the Marketing Cloud?
As mentioned above, the main functionalities of a Sender Profile are to differentiate the name of the sender and the e-mail address, as well as to manage forwarding and auto-responses based on Triggered Sends. All this by means of the possibility of creating as many Sender Profiles as we want and being able to use them only by changing the sending profile when doing so.
But you may ask yourself, isn’t it possible to personalize Sender Profiles based on the contact information of my company’s employees? The answer to this question is yes. Salesforce Marketing Cloud allows accounts that have the “Enhanced Sender Profile” feature to create a “Dynamic Sender Profile”.
Dynamic Sender Profiles
A Dynamic Sender Profile, is a dynamic Sender Profile that thanks to AMPscript technology changes its information “from name” and “from email” based on attributes previously loaded in the Salesforce CRM module for our customers.
The Dynamic Sender Profile will only work if the customers to be sent have two information fields previously loaded into the Data Extension and Sales Cloud with the attributes “from name” and “from email”. Once these attributes are loaded, using AMPscript technology and having created a Sender Profile that uses this technology to map the information loaded in the Marketing Cloud and Sales Cloud, the “from name” and “from email” will change based on the data loaded for each customer.
This is very useful when you have to send from different email addresses that correspond to employees of a company, and the content of the email is the same for all customers.
This particular Sender Profile, can have problems when there is a customer who does not have information loaded from these two attributes mentioned above, or the information loaded between Clouds is different. If this happens, Marketing Cloud will recognize the error and load the information “from name” and “from email” by default.
How to create a Sender Profile?
Creating a Sender Profile is a very simple process that will only take a minute. To do this, go to Email Studio and within the Admin tab in the Send Management section choose the option Sender Profiles.
Once you are in the Sender Profiles menu, just click on the Create button and once you are in the menu, all you have to do is fill in the requested fields with the data you want to put in your Sender Profile.
In the following image, you can see the steps to follow to reach the Sender Profile menu and create one:
What is a Triggered Send and how to assign it to a Sender Profile?
Triggered Sends are commonly used to send relevant, personalized and timely messages to users. These types of messages are usually welcome emails, automatic no-response emails or thank you emails when making a transaction, among others.
This type of sending allows you to associate it to a Sender Profile to show the sending information and associate it to a specific email previously created so that this type of email is always shown. In addition, they allow you to manage whether you want this Triggered Send to be excluded from any list or data extension, as well as to add users from this Triggered Send to different lists or data extensions.
To associate a Triggered Send to a Sender Profile, the only thing you need to do is enter the Sender Profile configuration (as shown above) and in the Custom Reply Mail Management Settings choose the options to use an auto-response or forward through a triggered send, that simple.
Advantages of creating Sender Profiles
As mentioned above, the main advantage of creating a Sender Profile is that we don’t have to fill in “from name” and “from email” information every time we send an email in the Marketing Cloud.
This advantage is reinforced with the possibility of creating Dynamic Sender Profiles, since once a Dynamic Sender Profile is created we can use that same profile to send an entire department, as long as the content of the emails is the same among all the Senders.
Finally, I would like to emphasize the main advantage that Marketing Cloud allows us to configure Triggered Emails to set up the auto-responses and forwarding of a Sender Profile.
In any project where you want to get the most out of Email Marketing strategies, the possibility of creating Sender Profiles with Marketing Cloud, allows a detailed customization, a considerable time saving and better results. Don’t hesitate to contact us if you have any doubts related to Marketing Cloud or if you would like us to guide you through its implementation.