Understanding what Reply Mail Management is when working in the Marketing Cloud is essential if you want to have a transversal communication between the company and the customer. If you need help in its configuration and in understanding all the functionalities that Marketing Cloud offers regarding Reply Mail Management, you are in the right article.
This post is focused on the specific use of Reply Mail Management in the Email Studio module within Marketing Cloud. If you are not yet familiar with this Marketing Cloud module, we invite you to read the following article, where it talks in depth about what Email Studio is: Email Studio in Marketing Cloud: what it is and what it offers. On the other hand, if you still do not know the Marketing Cloud platform or have not been clear about some concepts about it, you can visit the following article to familiarize yourself with it and know What is Marketing Cloud? The Salesforce Digital Marketing Hub.
Reply Mail Management: what is it?
When we talk about Reply Mail Management (or RMM) we mean the ways we handle responses to emails sent through the Marketing Cloud. These responses are produced automatically once Reply Mail Management is configured and include auto-responses and unsubscribe requests that we receive in response to emails already sent. In addition, Marketing Cloud allows us the ability to automatically forward emails when they need to be reviewed by a third party.
The first thing to do when configuring and using Reply Mail Management is to create a specific email address to be answered, called “reply-to address”. Once this address is created, when you receive an email, the RMM applies a set of matching rules to determine if the email is an out of office reply, an automatic reply or an unsubscribe request and acts on the message according to the previously configured characteristics.
The Reply Mail Management system also acts on these functions:
- Forward an email to different users depending on the circumstances of the received email.
- Make an auto-response and control the content of that auto-response message.
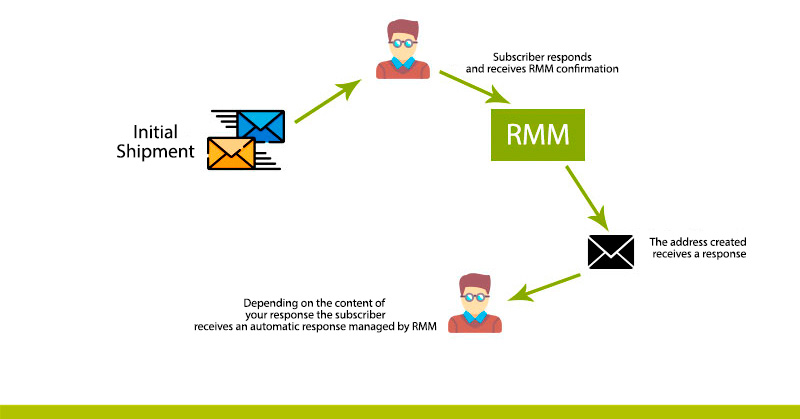
In the following image you can see an outline of how the RMM works in Marketing Cloud:
Options to consider during the configuration process
- Email Display Name. This is the name that appears when the subscriber responds to emails sent by the company. Ideally, a corporate name should be used in the case of a general email address, or there is also the possibility of using a name of a company employee.
- Reply Subdomain. The subdomain is the part of the URL that points to the Marketing Cloud auto-response rules. If the company has an email address with the following structure nombre@ejemplo.com, a subdomain must be created that contains this structure, such as: email.example.com or reply.example.com.
- Email Reply Address. Basically this option allows you to configure the email address that will appear to your subscriber in the communications they receive. It is important to establish a specific email address for this, such as: reply@ejemplo.com. Although this address is not a valid email address in most cases, it does not matter since the address manages the response through the RMM with the different sender profiles created.
- DNS Record Redirect Complete. Before enabling this option and configuring the RMM you must complete the Domain Name System (DNS) record. This process requires technical assistance from the ISP and the Marketing Cloud representative.
Configuración del Reply Mail Management
The process of setting up the RMM is a simple process, but it needs to be done in a certain way. The process comprises three general parts:
- Specifying a reply subdomain (as we have seen before).
- Request the relevant DNS changes from the ISP and the Marketing Cloud representative.
- Configure the RMM settings within the Marketing Cloud
The most interesting part is the third one, and therefore we are going to observe how it looks in Marketing Cloud.
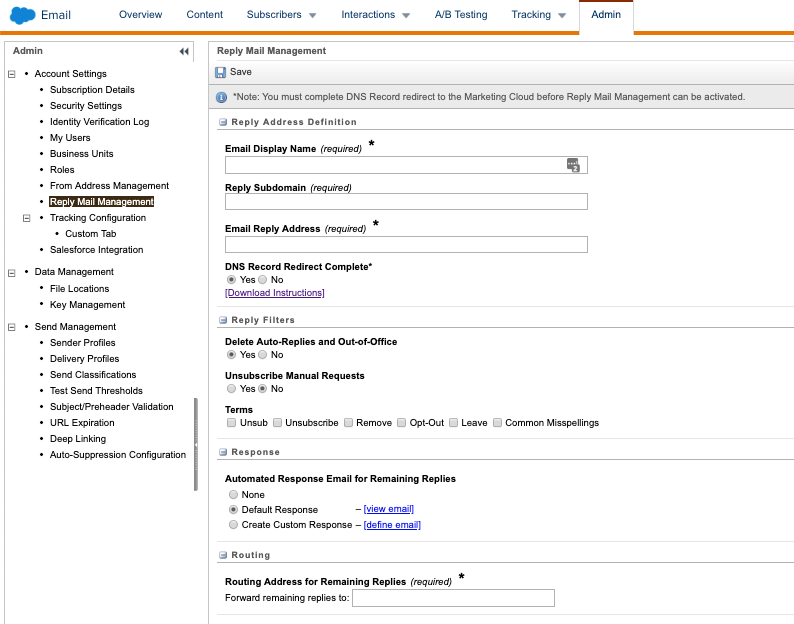
As we can see, there are 4 sections in the RMM settings: Reply Address Definition, Reply Filters, Response and Routing.
The most important is the first one, which has been explained above. Then, in the filters, Marketing Cloud offers us an option to delete the auto-responses and out-of-office messages and another one to manually manage the unsubscriptions. We must pay close attention to the Response section as this is where we can manage the auto-response message we want to be shown to our subscribers, whether it is going to be specific, general or not. Finally, we are asked to fill in an email address where the remaining autoresponders will be forwarded.
Once the RMM configuration is established, we can improve this process by creating sender profiles and configuring Triggered Sends for auto-responders. This is common because in this way, the degree of automation when answering our subscribers is much higher and it allows us a wide flexibility being able to send auto-responses from different Sender Profiles. If you want to find out more about what a sender profile is and how to create one in the Marketing Cloud, click on the following link Sender profiles in Marketing Cloud.
Case Study: Importance of the MRI
The company Global Tech S.A. sent 20,000 emails on Friday. Without the RMM option, starting Monday morning, employees should manually manage all incoming responses such as out-of-office, auto-responses, unsubscriptions, as well as individual customer responses.
However, with the addition of the RMM option which manages a large percentage of responses automatically on the spot, customers are completely satisfied as they receive personalized attention the very moment they send their email response.
In short, the configuration and implementation of the Reply Mail Management option is a great success in companies that handle a large volume of weekly emails and want to save time and costs in managing the responses of their subscribers. In addition, the implementation of this option allows to put the subscriber in the foreground and offer him an automatic, personalized and instantaneous response, thus improving the perception of the company by the customer.
Do not hesitate to contact us if you have any questions related to the Marketing Cloud or if you are interested in being guided through its implementation.